Blinks Developers

Resources for Blinks developers
Blinks Quick Start Guide
What’s Included
- 6x Blinks
- 6x custom PCBs,
- 6x 3D printed bases
- 6x 12 polarity aligned magnets
- 6x CR2032 coin cell batteries
- 6x battery/magnet security screw
- 1x Carry Case (magnetic enclosure for carrying 6 Blinks)
- Programmer
- 1x AVR Pocket AVR programmer (AKA USBtinyISP)
- 1x USB mini cable (3’)
- Service Port (used for Serial Monitor)
- 1x Blinks Serial Adapter
- 1x FTDI board (Red w/ usb on one side and 6 pins on the other)
- 1x Molex cable (4 black wires)
- 1x USB mini cable (6”)
Needed Software
- Arduino IDE - Download it here
- Blinks Library - Download it here
*If you want to have the latest and contribute to the development of Blinks, here’s our Github Repo
Installing the Blinks Library
After you have installed the Arduino IDE (> 1.8.5) and launched the application, you will notice that Arduino has created a folder in your Documents folder, aptly named, Arduino. Follow these next 5 steps to have the Blinks library installed:
- Create a folder called
hardwareinside of the Arduino folder~/Documents/Arduino/hardware(it will be next to ‘libraries’, not nested inside) and one more calledMove38-Blinks-Libraryinside of the hardware folder you just created.~/Documents/Arduino/hardware/Move38-Blinks-Library - Download the Blinks Library if you haven’t already done so
- Unzip the Blinks Library into a folder called
avr - Move the Blinks Library into the
Move38-Blinks-Libraryfolder (the path will be~/Documents/Arduino/hardware/Move38-Blinks-Library/avr/) - Restart Arduino (quit and relaunch)
If you click on Tools in your menu bar, and navigate down to Board: you should now see Move38: Blinks Tile at the bottom. Select it.
Next, click on Tools in your menu bar, and navigate down to Programmer: select the programmer USBTinyISP or see below for faster upload time with Blinks Programmer
Now if you go to File/Examples, you should see Examples for Blinks Tiles at the bottom of that list as well. Open the first one up and see if it compiles.
Transfer code to Blink
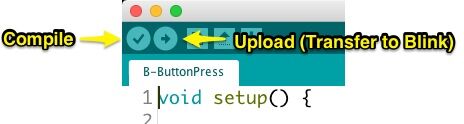
- Connect the USB programmer
- Place the magnetic programming jig on top of the Blink
- Press
Uploadto transfer
Not successfully transferring to your Blinks? try these troubleshooting tips from the forum
Windows Troubleshooting
No programmer detected? Check to make sure you have the correct driver installed, relaunch the Ardunio IDE and then you should be able to select USBTinyISP from the Tools > Programmer drop-down in Arduino.
For the extra curious, here is the source code for that driver.
Using the Blinks Service Port to talk to or listen to your Blink
The Service Port is by no means necessary, but is a phenomenal tool for debugging code and refining early sketches into robust games. The following steps show you how to use your Blinks Service Port.
- Put together the components of your Blinks Service port so they look like this
- USB Cable → FTDI → Blinks Serial Adapter → Molex Cable → Blink (w/ Serial port)
-
- Open Arduino
- click on
Toolsin your menu bar, and navigate down toPort:you should now seeCOM3on a PC and/dev/cu...on a Mac. Select it. - press the magnifying glass in the top right corner of the Arduino IDE to open the Serial Monitor
Note: The serial port is at a fixed 1,000,000 baud rate (set it in the drop-down).
To write to the Serial port from a sketch,
- Add “#include Serial.h”
- Instantiate a ServicePortSerial class, like this
ServicePortSerial sp - Call the begin method within setup(), like this
sp.begin()
Here is the simplest of ServicePort sketches:
Unboxing And Walkthrough Video
And last but not least, here’s a handy little unboxing video that will walk you through some basics!